

DIY Weihnachtsanhänger
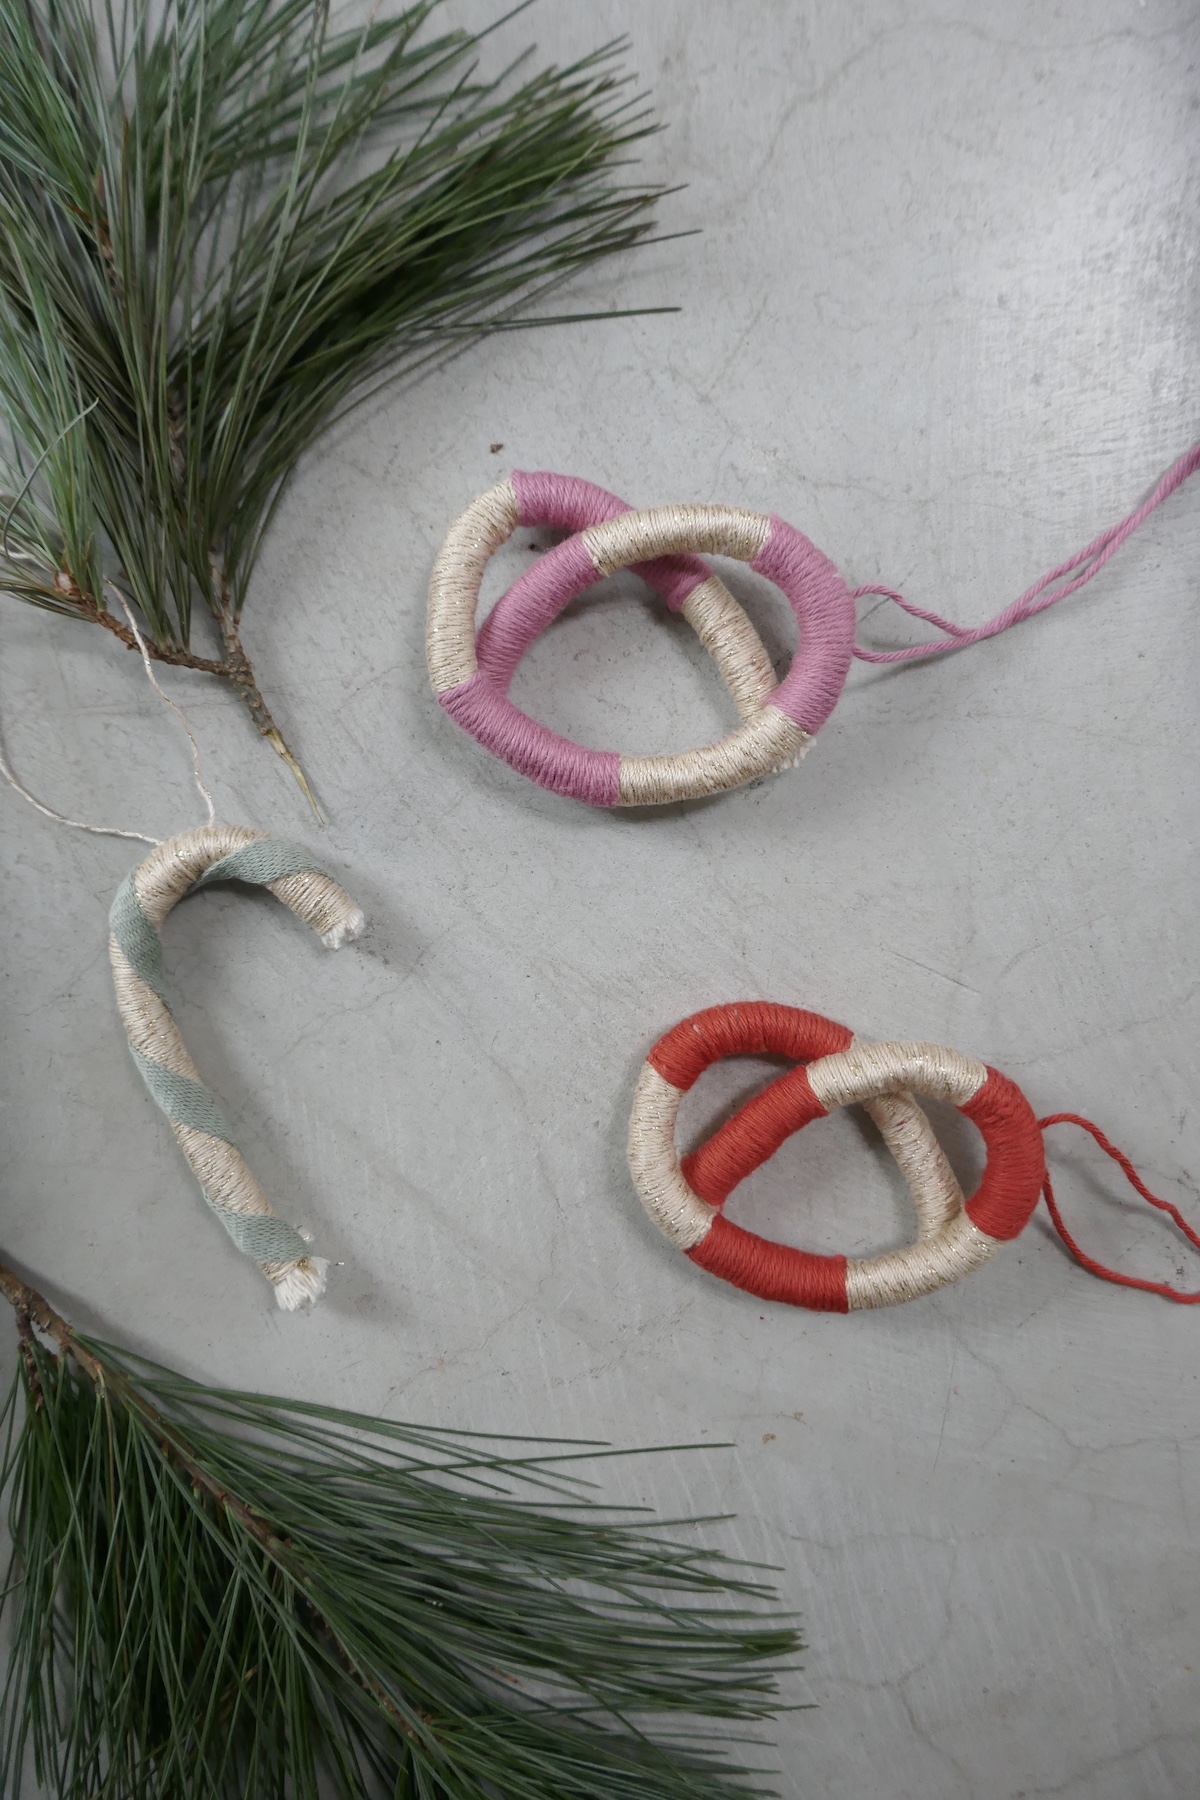
[et_pb_section fb_built=“1″ _builder_version=“3.22″ fb_built=“1″ _i=“0″ _address=“0″][et_pb_row _builder_version=“3.25″ background_size=“initial“ background_position=“top_left“ background_repeat=“repeat“ custom_padding=“18.2969px|0px|0px|0px“ _i=“0″ _address=“0.0″][et_pb_column type=“4_4″ _builder_version=“3.25″ custom_padding=“|||“ _i=“0″ _address=“0.0.0″ custom_padding__hover=“|||“][et_pb_image src=“https://mummy-mag.de/wp-content/uploads/2019/12/Mummy-Mag-Anhänger_06.jpeg“ align_tablet=“center“ align_last_edited=“on|desktop“ _builder_version=“3.29.3″ animation_style=“slide“ animation_direction=“left“ animation_duration=“500ms“ animation_intensity_slide=“10%“ _i=“0″ _address=“0.0.0.0″][/et_pb_image][et_pb_text _builder_version=“3.29.3″ _i=“1″ _address=“0.0.0.1″]Zugegeben, ich bin viel zu geizig Geld für Dekoartikel auszugeben. Im Nachhinein ärgere ich mich dann allerdings oftmals, dass ich es doch nicht gekauft habe. Genauso ging es mir mit den Weihnachtsanhängern, die ich letztens entdeckt hatte. Ich rede mir die Sachen dann in dem Moment wirklich gut aus – und kaum zu Hause angekommen merke ich, wie gut sie sich doch z.B. am Adventskalender gemacht hätten. Mein Frust verwandelte sich schnell in Kreativität und so kam ich auf die Idee, die Anhänger einfach mal wieder selber zu basteln. Vor einem Jahr habe ich auf meinem Instagramprofil bereits die schönen Regenbögen gezeigt. Nun habe ich das DIY einfach etwas abgewandelt und herausgekommen sind kleine Brezeln und Zuckerstangen. Bei mir hängen sie aktuell als Deko am Adventskalender, allerdings machen sie sich auch sehr gut als Tischdekoration oder Baumschmuck oder auf Geschenken. Besonders geeignet übrigens für Familien mit Krabbelkindern, die liebend gerne den Schmuck von Baum reißen – hier kann nichts zerbrechen!
[/et_pb_text][et_pb_text admin_label=“< MORE >“ _builder_version=“3.27.4″ text_font=“||||“ header_font=“||||“ text_font_size_tablet=“14″ text_font_size_phone=“14″ text_letter_spacing_tablet=“0px“ text_letter_spacing_phone=“0px“ text_line_height_tablet=“1.7em“ text_line_height_phone=“1.7em“ header_font_size_tablet=“30px“ header_font_size_phone=“30px“ header_letter_spacing_tablet=“0px“ header_letter_spacing_phone=“0px“ header_line_height_tablet=“1em“ header_line_height_phone=“1em“ saved_tabs=“all“ _i=“2″ _address=“0.0.0.2″] [/et_pb_text][/et_pb_column][/et_pb_row][et_pb_row column_structure=“1_2,1_2″ _builder_version=“3.25″ background_size=“initial“ background_position=“top_left“ background_repeat=“repeat“ _i=“1″ _address=“0.1″][et_pb_column type=“1_2″ _builder_version=“3.25″ custom_padding=“|||“ _i=“0″ _address=“0.1.0″ custom_padding__hover=“|||“][et_pb_image src=“https://mummy-mag.de/wp-content/uploads/2019/12/Mummy-Mag-Anhänger-.jpeg“ _builder_version=“3.29.3″ _i=“0″ _address=“0.1.0.0″][/et_pb_image][/et_pb_column][et_pb_column type=“1_2″ _builder_version=“3.25″ custom_padding=“|||“ _i=“1″ _address=“0.1.1″ custom_padding__hover=“|||“][et_pb_blurb title=“Das braucht ihr:“ image_max_width=“none“ _builder_version=“3.29.3″ body_text_align=“left“ width=“94.6%“ min_height=“400px“ custom_padding=“20px|0px|1px|15px||“ hover_enabled=“0″ border_width_all=“4px“ border_color_all=“#377749″ border_style_all=“dotted“ use_border_color=“on“ border_color=“#377749″ border_width=“4px“ border_style=“dotted“ _i=“0″ _address=“0.1.1.0″]- Makrameegarn
- Wolle in verschiedene Farben – gerne mit Glitzereffekt
- breite Wolle für die Zuckerstangen
- Wollnadel
- Schere
- Draht
STEP 1
Für die Brezeln schneidet euch ca. 30 cm des Macramegarns ab. Ich habe davon 3 Bänder genommen, damit die Brezeln etwas dicker werden.
STEP 2
Knotet am Anfang des Garns eure Wolle in Wunschfarbe und wickelt nun ein Stück fest um das Garn herum. Danach knotet ihr es wieder fest.
STEP 3
Nun beginnt ihr mit der zweiten Farbe. Schön sieht es aus, wenn ihr eine Wolle mit glänzendem Faden wählt. So wirkt der Anhänger direkt viel weihnachtlicher. Knotet es fest und wickelt die Wolle wiederum fest um das Garn. (Den Restfaden der ersten Farbe einfach mit umwickeln, so kann nichts aufgehen)
STEP 4
Nun wickelt ihr eure Farben abwechselnd bis zum Ende des Garns. Am Ende den Restfaden mit der Nadeln vernähen.
STEP 5
Wenn ihr die Wolle fest um das Garn gewickelt habt entsteht automatisch so ein Halbkreis.
STEP 6
Legt euch nun einmal die Form der Brezel Probe, damit ihr wisst an welcher Stelle ihr die Enden vernähen müsst.
STEP 7
Nimm nun Wolle und Nadel und nähe die Enden fest.
STEP 8
Nun noch das überstehende Garn an den Enden so kurz wie möglich schneiden.
STEP 9
Zum Schluss noch einen Faden zum Aufhängen befestigen.
[/et_pb_text][et_pb_text _builder_version=“3.29.3″ _i=“2″ _address=“0.5.0.2″]
Zuckerstangen
[/et_pb_text][et_pb_image src=“https://mummy-mag.de/wp-content/uploads/2019/12/Mummy-Mag-Zuckerstange-Step-1.jpeg“ show_in_lightbox=“on“ align_tablet=“center“ align_last_edited=“on|desktop“ _builder_version=“3.29.3″ custom_margin=“-1px|||||“ custom_padding=“0px|||||“ animation_style=“slide“ animation_direction=“left“ animation_duration=“500ms“ animation_intensity_slide=“10%“ _i=“3″ _address=“0.5.0.3″][/et_pb_image][et_pb_text _builder_version=“3.29.3″ width=“100%“ custom_padding=“|0px||||“ _i=“4″ _address=“0.5.0.4″]Für die Zuckerstange habe ich 3 ca. 16cm lange Baumwollgarne abgeschnitten. Es empfiehlt sich um das Garn einen Draht zu kleben und die Wolle erst dann drüber zu wickeln. So könnt ihr dann den oberen Teil nach unten biegen und die Stange behält ihre Form.
[/et_pb_text][/et_pb_column][et_pb_column type=“1_2″ _builder_version=“3.25″ custom_padding=“|||“ _i=“1″ _address=“0.5.1″ custom_padding__hover=“|||“][et_pb_image src=“https://mummy-mag.de/wp-content/uploads/2019/12/Mummy-Mag-Brezel-Step-13.jpg“ _builder_version=“3.29.3″ _i=“0″ _address=“0.5.1.0″][/et_pb_image][et_pb_text _builder_version=“3.29.3″ _i=“1″ _address=“0.5.1.1″]Fertig!
[/et_pb_text][et_pb_image src=“https://mummy-mag.de/wp-content/uploads/2019/12/Mummy-Mag-Zuckerstange-Step-2.jpg“ _builder_version=“3.29.3″ min_height=“152px“ custom_margin=“99px|||||“ custom_padding=“44px|||||“ _i=“2″ _address=“0.5.1.2″][/et_pb_image][/et_pb_column][/et_pb_row][et_pb_row column_structure=“1_2,1_2″ _builder_version=“3.25″ background_size=“initial“ background_position=“top_left“ background_repeat=“repeat“ custom_padding=“0px|0px|0px|0px||“ _i=“6″ _address=“0.6″][et_pb_column type=“1_2″ _builder_version=“3.25″ custom_padding=“|||“ _i=“0″ _address=“0.6.0″ custom_padding__hover=“|||“][et_pb_image src=“https://mummy-mag.de/wp-content/uploads/2019/12/Mummy-Mag-Zuckerstange-Step-3.jpeg“ show_in_lightbox=“on“ align_tablet=“center“ align_last_edited=“on|desktop“ _builder_version=“3.29.3″ custom_margin=“42px|||||“ animation_style=“slide“ animation_direction=“left“ animation_duration=“500ms“ animation_intensity_slide=“10%“ _i=“0″ _address=“0.6.0.0″][/et_pb_image][/et_pb_column][et_pb_column type=“1_2″ _builder_version=“3.25″ custom_padding=“|||“ _i=“1″ _address=“0.6.1″ custom_padding__hover=“|||“][et_pb_image src=“https://mummy-mag.de/wp-content/uploads/2019/12/Mummy-Mag-Zuckerstange-Step-4.jpg“ _builder_version=“3.29.3″ min_height=“607px“ custom_padding=“41px|||||“ _i=“0″ _address=“0.6.1.0″][/et_pb_image][/et_pb_column][/et_pb_row][et_pb_row _builder_version=“3.25″ background_size=“initial“ background_position=“top_left“ background_repeat=“repeat“ custom_margin=“-175px|auto||auto||“ custom_padding=“201px|0px|18.2969px|0px||“ _i=“7″ _address=“0.7″][et_pb_column type=“4_4″ _builder_version=“3.25″ custom_padding=“|||“ _i=“0″ _address=“0.7.0″ custom_padding__hover=“|||“][et_pb_text _builder_version=“3.29.3″ width=“100%“ hover_enabled=“0″ _i=“0″ _address=“0.7.0.0″]Wenn ihr die Basisfarbe (Gold) einmal um das Garn gewickelt und verknotet/vernäht habt könnt ihr nun die Schrägen Streifen drüber wickeln und am Anfang und Ende festnähen. Die überstehenden Fransen wieder abschneiden und fertig.
[/et_pb_text][et_pb_image src=“https://mummy-mag.de/wp-content/uploads/2019/12/Mummy-Mag-Zuckerstange-Step-5.jpg“ show_in_lightbox=“on“ align_tablet=“center“ align_last_edited=“on|desktop“ _builder_version=“3.29.3″ custom_margin=“-10px|||||“ animation_style=“slide“ animation_direction=“left“ animation_duration=“500ms“ animation_intensity_slide=“10%“ _i=“1″ _address=“0.7.0.1″][/et_pb_image][/et_pb_column][/et_pb_row][et_pb_row _builder_version=“3.25″ background_size=“initial“ background_position=“top_left“ background_repeat=“repeat“ custom_padding=“0px|0px|18.2969px|0px“ _i=“8″ _address=“0.8″][et_pb_column type=“4_4″ _builder_version=“3.25″ custom_padding=“|||“ _i=“0″ _address=“0.8.0″ custom_padding__hover=“|||“][et_pb_image src=“https://mummy-mag.de/wp-content/uploads/2019/12/Mummy-Mag-Anhänger_11.jpeg“ show_in_lightbox=“on“ align_tablet=“center“ align_last_edited=“on|desktop“ _builder_version=“3.29.3″ animation_style=“slide“ animation_direction=“left“ animation_duration=“500ms“ animation_intensity_slide=“10%“ _i=“0″ _address=“0.8.0.0″][/et_pb_image][et_pb_text _builder_version=“3.29.3″ custom_margin=“24px|||||“ _i=“1″ _address=“0.8.0.1″]***Viel Spaß beim Nachbasteln***
[/et_pb_text][/et_pb_column][/et_pb_row][et_pb_row _builder_version=“3.25″ background_size=“initial“ background_position=“top_left“ background_repeat=“repeat“ _i=“9″ _address=“0.9″][et_pb_column type=“4_4″ _builder_version=“3.25″ custom_padding=“|||“ _i=“0″ _address=“0.9.0″ custom_padding__hover=“|||“][et_pb_divider divider_style=“dotted“ divider_weight=“4″ disabled_on=“on|on|off“ _builder_version=“3.2″ _i=“0″ _address=“0.9.0.0″][/et_pb_divider][et_pb_text _builder_version=“3.29.3″ _i=“1″ _address=“0.9.0.1″]
Mehr zum Thema DIY auf MUMMY MAG
[/et_pb_text][/et_pb_column][/et_pb_row][et_pb_row column_structure=“1_2,1_2″ _builder_version=“3.25″ custom_padding=“0px|0px|30px|0px“ _i=“10″ _address=“0.10″][et_pb_column type=“1_2″ _builder_version=“3.25″ custom_padding=“|||“ _i=“0″ _address=“0.10.0″ custom_padding__hover=“|||“][et_pb_image src=“https://mummy-mag.de/wp-content/uploads/2019/10/Mummy-Mag-Wandlicht-Herz-10-e1572350432531.jpg“ url=“https://mummy-mag.de/diy-wandlicht-fur-mehr-gemutlichkeit-im-kinderzimmer/“ url_new_window=“on“ align_tablet=“center“ align_last_edited=“on|desktop“ _builder_version=“3.29.3″ animation_style=“slide“ animation_direction=“left“ animation_duration=“500ms“ animation_intensity_slide=“10%“ _i=“0″ _address=“0.10.0.0″][/et_pb_image][et_pb_text _builder_version=“3.29.3″ _i=“1″ _address=“0.10.0.1″]Das einfache und schnelle DIY zum hübschen Wandlicht findet ihr hier.
[/et_pb_text][/et_pb_column][et_pb_column type=“1_2″ _builder_version=“3.25″ custom_padding=“|||“ _i=“1″ _address=“0.10.1″ custom_padding__hover=“|||“][et_pb_image src=“https://mummy-mag.de/wp-content/uploads/2019/11/Mummymag-Adventskalender-18.jpg“ url=“https://mummy-mag.de/diy-adventskalender-ein-kalender-drei-versionen/“ _builder_version=“3.29.3″ _i=“0″ _address=“0.10.1.0″][/et_pb_image][et_pb_text _builder_version=“3.29.3″ _i=“1″ _address=“0.10.1.1″]Den passenden Adventskalender findet iht hier.
[/et_pb_text][/et_pb_column][/et_pb_row][/et_pb_section]Katharina
Basteln ist ihr Yoga. Als Ausgleich zu ihrem Alltag mit ihren 3 Mädels nimmt Katharina sich gerne die Zeit, ganz in Ruhe, schöne Dinge zu kreieren. Ob für die Kinder, oder mit den Kindern, für sich ganz alleine oder auch nur mal in netter Mädelsrunde, da wird der Kreativität keine Grenze gesetzt. Ihr Motto ‚weniger ist mehr‘ wird dabei nie außer Acht gelassen. Dekoration ist schön, aber es sollte nie zu überladen sein.