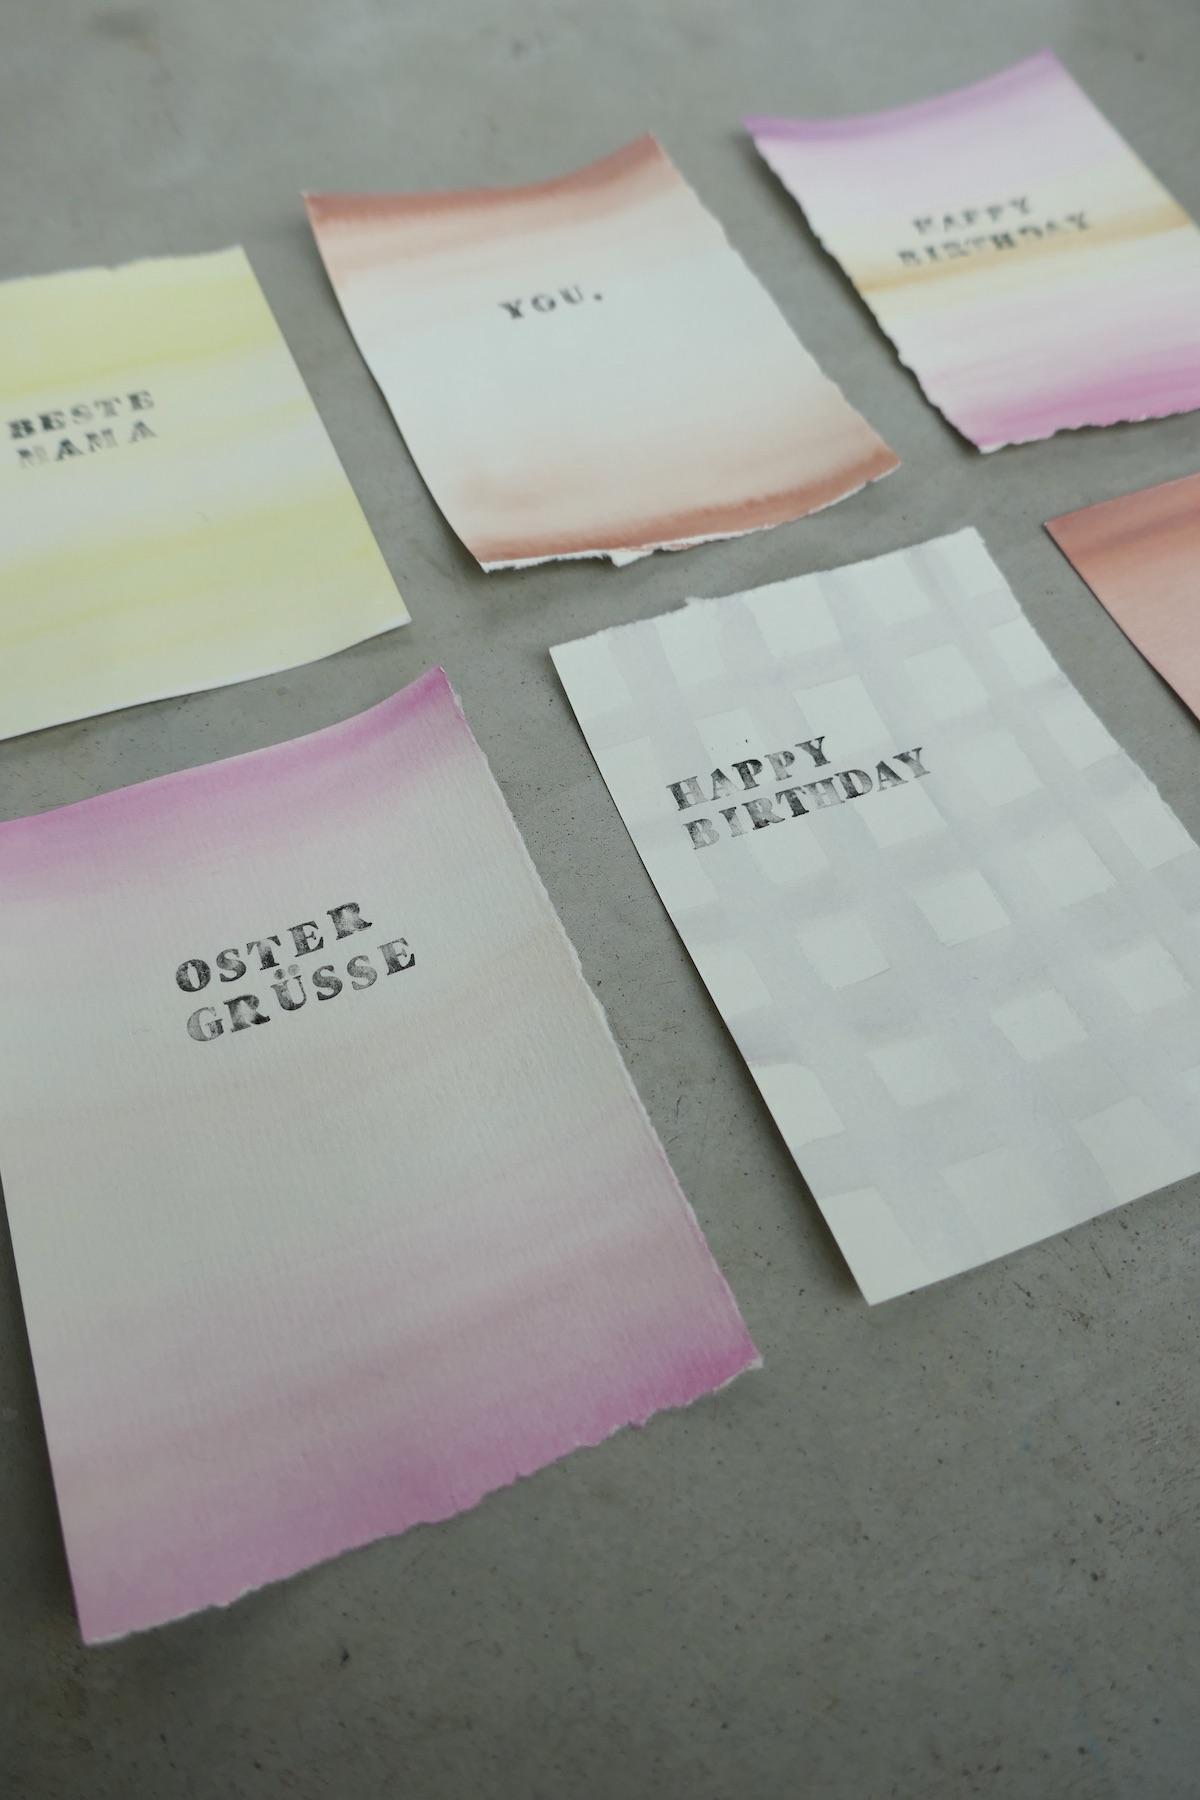
DIY Aquarellkarte
Für jeden Anlass die richtige Karte

[et_pb_section fb_built=“1″ _builder_version=“3.29.3″ collapsed=“off“ fb_built=“1″ _i=“0″ _address=“0″][et_pb_row _builder_version=“3.29.3″ background_size=“initial“ background_position=“top_left“ background_repeat=“repeat“ custom_padding=“18.2969px|0px|0px|0px“ _i=“0″ _address=“0.0″][et_pb_column type=“4_4″ _builder_version=“3.25″ custom_padding=“|||“ _i=“0″ _address=“0.0.0″ custom_padding__hover=“|||“][et_pb_image src=“https://mummy-mag.de/wp-content/uploads/2020/04/DIY-Aquarellkarten_7.jpeg“ align_tablet=“center“ align_last_edited=“on|desktop“ _builder_version=“3.29.3″ animation_style=“slide“ animation_direction=“left“ animation_duration=“500ms“ animation_intensity_slide=“10%“ _i=“0″ _address=“0.0.0.0″][/et_pb_image][et_pb_text admin_label=“Text“ _builder_version=“3.29.3″ custom_padding=“||0px|||“ _i=“1″ _address=“0.0.0.1″]

Karten kann man doch nie genug auf Vorrat haben.  Ich persönlich habe immer welche zu Hause, allerdings dann doch meist nie die Passende für den jeweiligen Anlass. Nun habe ich mal ein paar ganz universell einsetzbare Karten mit Wasserfarben gestaltet, die man dann mit Stempeln ganz individuell noch anpassen kann. Momentan basteln wir ja nun alle sehr viel mit den Kids, und auch hier ist der Kreativität keine Grenze gesetzt. Lasst die Kleinen einfach wild drauf rum malen, tupfen etc. Es werden sicher sehr hübsche Karten dabei entstehen.

[/et_pb_text][et_pb_text admin_label=“< MORE >“ _builder_version=“3.27.4″ text_font=“||||“ header_font=“||||“ text_font_size_tablet=“14″ text_font_size_phone=“14″ text_letter_spacing_tablet=“0px“ text_letter_spacing_phone=“0px“ text_line_height_tablet=“1.7em“ text_line_height_phone=“1.7em“ header_font_size_tablet=“30px“ header_font_size_phone=“30px“ header_letter_spacing_tablet=“0px“ header_letter_spacing_phone=“0px“ header_line_height_tablet=“1em“ header_line_height_phone=“1em“ saved_tabs=“all“ _i=“2″ _address=“0.0.0.2″] [/et_pb_text][/et_pb_column][/et_pb_row][et_pb_row column_structure=“1_2,1_2″ _builder_version=“3.29.3″ background_size=“initial“ background_position=“top_left“ background_repeat=“repeat“ custom_margin=“|41px||auto||“ custom_padding=“||0px|||“ _i=“1″ _address=“0.1″][et_pb_column type=“1_2″ _builder_version=“3.25″ custom_padding=“|||“ _i=“0″ _address=“0.1.0″ custom_padding__hover=“|||“][et_pb_image src=“https://mummy-mag.de/wp-content/uploads/2020/04/DIY-Aquarellkarten.jpeg“ _builder_version=“3.29.3″ _i=“0″ _address=“0.1.0.0″][/et_pb_image][/et_pb_column][et_pb_column type=“1_2″ _builder_version=“3.25″ custom_padding=“|||“ _i=“1″ _address=“0.1.1″ custom_padding__hover=“|||“][et_pb_blurb title=“Das braucht ihr:“ image_max_width=“none“ _builder_version=“3.29.3″ body_text_align=“left“ width=“94.6%“ min_height=“299px“ custom_margin=“||-4px|||“ custom_padding=“20px|0px|0px|15px||“ border_width_all=“4px“ border_color_all=“#377749″ border_style_all=“dotted“ use_border_color=“on“ border_color=“#377749″ border_width=“4px“ border_style=“dotted“ _i=“0″ _address=“0.1.1.0″][/et_pb_blurb][/et_pb_column][/et_pb_row][et_pb_row column_structure=“1_2,1_2″ _builder_version=“3.25″ background_size=“initial“ background_position=“top_left“ background_repeat=“repeat“ custom_padding=“53px||15px|||“ _i=“2″ _address=“0.2″ min_height=“832px“][et_pb_column type=“1_2″ _builder_version=“3.25″ custom_padding=“|||“ _i=“0″ _address=“0.2.0″ custom_padding__hover=“|||“][et_pb_image src=“https://mummy-mag.de/wp-content/uploads/2020/04/DIY-Aquarellkarten_0.jpeg“ _builder_version=“3.29.3″ hover_enabled=“0″ _i=“0″ _address=“0.2.0.0″][/et_pb_image][et_pb_text _builder_version=“3.29.3″ _i=“1″ _address=“0.2.0.1″]

STEP 1
Schneidet oder reißt euch das Papier bereits  im Vorfeld auf eure Kartengröße zurecht und betupft es ordentlich mit Wasser.

[/et_pb_text][/et_pb_column][et_pb_column type=“1_2″ _builder_version=“3.29.3″ _i=“1″ _address=“0.2.1″][et_pb_image src=“https://mummy-mag.de/wp-content/uploads/2020/04/DIY-Aquarellkarten_1.jpeg“ _builder_version=“3.29.3″ hover_enabled=“0″ _i=“0″ _address=“0.2.1.0″][/et_pb_image][et_pb_text _builder_version=“3.29.3″ _i=“1″ _address=“0.2.1.1″]

STEP 2
Nun malt mit ganz wenig Farbe eine Linie quer über das Papier und verteilt danach die Farbe mit viel Wasser, sodass ein leichter Farbverlauf entsteht. 

[/et_pb_text][/et_pb_column][/et_pb_row][et_pb_row _builder_version=“3.25″ background_size=“initial“ background_position=“top_left“ background_repeat=“repeat“ min_height=“414px“ custom_margin=“|auto|-152px|auto||“ custom_padding=“0px|0px|0px|0px||“ _i=“3″ _address=“0.3″ column_structure=“1_2,1_2″][et_pb_column type=“1_2″ _builder_version=“3.25″ custom_padding=“|||“ _i=“0″ _address=“0.3.0″ custom_padding__hover=“|||“][et_pb_image src=“https://mummy-mag.de/wp-content/uploads/2020/04/DIY-Aquarellkarten_2.jpeg“ show_in_lightbox=“on“ align_tablet=“center“ align_last_edited=“on|desktop“ _builder_version=“3.29.3″ animation_style=“slide“ animation_direction=“left“ animation_duration=“500ms“ animation_intensity_slide=“10%“ hover_enabled=“0″ _i=“0″ _address=“0.3.0.0″][/et_pb_image][et_pb_text _builder_version=“3.29.3″ _i=“1″ _address=“0.3.0.1″]

STEP 3
Hier habe ich oben und unten etwas Farbe aufgetragen und danach mit dem Pinsel und viel Wasser zur Mitte hin die Farbe verteilt.

[/et_pb_text][/et_pb_column][et_pb_column _builder_version=“3.29.3″ type=“1_2″][et_pb_image _builder_version=“3.29.3″ src=“https://mummy-mag.de/wp-content/uploads/2020/04/DIY-Aquarellkarten_5.jpeg“ hover_enabled=“0″][/et_pb_image][et_pb_text _builder_version=“3.29.3″ _i=“1″ _address=“0.3.0.1″]


Falls sich die Seiten etwas hochbiegen, solltet ihr sie nach den Trocknen eine Zeit lang beschweren.

[/et_pb_text][/et_pb_column][/et_pb_row][et_pb_row column_structure=“1_2,1_2″ _builder_version=“3.25″ background_size=“initial“ background_position=“top_left“ background_repeat=“repeat“ min_height=“367px“ custom_margin=“219px|auto||auto||“ custom_padding=“0px|0px|0px|0px||“ _i=“4″ _address=“0.4″][et_pb_column type=“1_2″ _builder_version=“3.25″ custom_padding=“|||“ _i=“0″ _address=“0.4.0″ custom_padding__hover=“|||“][et_pb_image src=“https://mummy-mag.de/wp-content/uploads/2020/04/DIY-Aquarellkarten_6.jpeg“ show_in_lightbox=“on“ align_tablet=“center“ align_last_edited=“on|desktop“ _builder_version=“3.29.3″ min_height=“231px“ animation_style=“slide“ animation_direction=“left“ animation_duration=“500ms“ animation_intensity_slide=“10%“ hover_enabled=“0″ _i=“0″ _address=“0.4.0.0″][/et_pb_image][et_pb_text _builder_version=“3.29.3″ _i=“1″ _address=“0.3.0.1″]

STEP 4
Nun einmal die Farbe ausreichend trocknen lassen.

[/et_pb_text][/et_pb_column][et_pb_column type=“1_2″ _builder_version=“3.25″ custom_padding=“|||“ _i=“0″ _address=“0.4.0″ custom_padding__hover=“|||“][et_pb_image _builder_version=“3.29.3″ src=“https://mummy-mag.de/wp-content/uploads/2020/04/DIY-Aquarellkarten_7.jpeg“ hover_enabled=“0″][/et_pb_image][et_pb_text _builder_version=“3.29.3″ _i=“1″ _address=“0.3.0.1″]

STEP 5
Jetzt kann das Stempeln beginnen. Hierbei könnt ihr euch nach Lust & Laune austoben.

[/et_pb_text][/et_pb_column][/et_pb_row][et_pb_row column_structure=“1_3,1_3,1_3″ _builder_version=“3.25″ background_size=“initial“ background_position=“top_left“ background_repeat=“repeat“ min_height=“367px“ custom_margin=“69px|auto||auto||“ custom_padding=“0px|0px|10px|0px||“ _i=“4″ _address=“0.4″][et_pb_column type=“1_3″ _builder_version=“3.25″ custom_padding=“|||“ _i=“0″ _address=“0.4.0″ custom_padding__hover=“|||“][et_pb_image src=“https://mummy-mag.de/wp-content/uploads/2020/04/DIY-Aquarellkarten_8.jpeg“ show_in_lightbox=“on“ align_tablet=“center“ align_last_edited=“on|desktop“ _builder_version=“3.29.3″ min_height=“231px“ animation_style=“slide“ animation_direction=“left“ animation_duration=“500ms“ animation_intensity_slide=“10%“ hover_enabled=“0″ _i=“0″ _address=“0.4.0.0″][/et_pb_image][/et_pb_column][et_pb_column type=“1_3″ _builder_version=“3.25″ custom_padding=“|||“ _i=“0″ _address=“0.4.0″ custom_padding__hover=“|||“][et_pb_image _builder_version=“3.29.3″ src=“https://mummy-mag.de/wp-content/uploads/2020/04/DIY-Aquarellkarten_11.jpeg“ hover_enabled=“0″][/et_pb_image][/et_pb_column][et_pb_column type=“1_3″ _builder_version=“3.25″ custom_padding=“|||“ _i=“0″ _address=“0.4.0″ custom_padding__hover=“|||“][et_pb_image _builder_version=“3.29.3″ src=“https://mummy-mag.de/wp-content/uploads/2020/04/DIY-Aquarellkarten_9.jpeg“ hover_enabled=“0″][/et_pb_image][/et_pb_column][/et_pb_row][et_pb_row _builder_version=“3.25″ background_size=“initial“ background_position=“top_left“ background_repeat=“repeat“ min_height=“367px“ custom_margin=“219px|auto||auto||“ custom_padding=“0px|0px|49px|0px||“ hover_enabled=“0″ _i=“4″ _address=“0.4″][et_pb_column type=“4_4″ _builder_version=“3.25″ custom_padding=“|||“ _i=“0″ _address=“0.4.0″ custom_padding__hover=“|||“][et_pb_image src=“https://mummy-mag.de/wp-content/uploads/2020/04/DIY-Aquarellkarten_10.jpeg“ show_in_lightbox=“on“ align_tablet=“center“ align_last_edited=“on|desktop“ _builder_version=“3.29.3″ min_height=“333px“ animation_style=“slide“ animation_direction=“left“ animation_duration=“500ms“ animation_intensity_slide=“10%“ hover_enabled=“0″ _i=“0″ _address=“0.4.0.0″ custom_margin=“-163px|||||“][/et_pb_image][/et_pb_column][/et_pb_row][et_pb_row _builder_version=“3.29.3″ background_size=“initial“ background_position=“top_left“ background_repeat=“repeat“ min_height=“21px“ custom_margin=“-3px|auto||auto||“ custom_padding=“0px|0px|0px|0px||“ _i=“5″ _address=“0.5″][et_pb_column type=“4_4″ _builder_version=“3.25″ custom_padding=“|||“ _i=“0″ _address=“0.5.0″ custom_padding__hover=“|||“][et_pb_text _builder_version=“3.29.3″ min_height=“60px“ custom_margin=“24px|||||“ _i=“0″ _address=“0.5.0.0″]

***Viel Spaß beim Basteln***

[/et_pb_text][/et_pb_column][/et_pb_row][et_pb_row _builder_version=“3.25″ background_size=“initial“ background_position=“top_left“ background_repeat=“repeat“ _i=“6″ _address=“0.6″][et_pb_column type=“4_4″ _builder_version=“3.25″ custom_padding=“|||“ _i=“0″ _address=“0.6.0″ custom_padding__hover=“|||“][et_pb_divider divider_style=“dotted“ divider_weight=“4″ disabled_on=“on|on|off“ _builder_version=“3.2″ _i=“0″ _address=“0.6.0.0″][/et_pb_divider][et_pb_text _builder_version=“3.29.3″ _i=“1″ _address=“0.6.0.1″]

Mehr zum Thema DIY auf MUMMY MAG

[/et_pb_text][/et_pb_column][/et_pb_row][et_pb_row column_structure=“1_2,1_2″ _builder_version=“3.25″ custom_margin=“|auto|17px|auto||“ custom_padding=“0px|0px|30px|0px“ _i=“7″ _address=“0.7″][et_pb_column type=“1_2″ _builder_version=“3.25″ custom_padding=“|||“ _i=“0″ _address=“0.7.0″ custom_padding__hover=“|||“][et_pb_image src=“https://mummy-mag.de/wp-content/uploads/2020/03/IMG_5192.jpg“ url=“https://mummy-mag.de/diy-gluecksbringer-fuer-die-hosentasche-mit-buegelperlen/“ url_new_window=“on“ align_tablet=“center“ align_last_edited=“on|desktop“ _builder_version=“3.29.3″ animation_style=“slide“ animation_direction=“left“ animation_duration=“500ms“ animation_intensity_slide=“10%“ hover_enabled=“0″ _i=“0″ _address=“0.7.0.0″][/et_pb_image][et_pb_text _builder_version=“3.29.3″ _i=“1″ _address=“0.7.0.1″]

Süße Glücksbringer für die Hosentasche gibt’s hier.

[/et_pb_text][/et_pb_column][et_pb_column type=“1_2″ _builder_version=“3.25″ custom_padding=“|||“ _i=“1″ _address=“0.7.1″ custom_padding__hover=“|||“][et_pb_image src=“https://mummy-mag.de/wp-content/uploads/2020/02/DIY-Wandteppich-18.jpeg“ url=“https://mummy-mag.de/diy-wandteppich-ein-it-piece-fuer-das-kinderzimmer/“ _builder_version=“3.29.3″ _i=“0″ _address=“0.7.1.0″][/et_pb_image][et_pb_text _builder_version=“3.29.3″ hover_enabled=“0″ _i=“1″ _address=“0.7.1.1″]

Lust auf einen schönen Wandteppich für das Kinderzimmer? Das DIY findet ihr hier.

[/et_pb_text][/et_pb_column][/et_pb_row][/et_pb_section]

Basteln ist ihr Yoga. Als Ausgleich zu ihrem Alltag mit ihren 3 Mädels nimmt Katharina sich gerne die Zeit, ganz in Ruhe, schöne Dinge zu kreieren. Ob für die Kinder, oder mit den Kindern, für sich ganz alleine oder auch nur mal in netter Mädelsrunde, da wird der Kreativität keine Grenze gesetzt. Ihr Motto ‚weniger ist mehr‘ wird dabei nie außer Acht gelassen. Dekoration ist schön, aber es sollte nie zu überladen sein.